Google AppSheet là chiếc chìa khóa giúp doanh nghiệp tiến nhanh hơn trên con đường…
Mail merge – How to send personalized emails to multiple people
The following article, Gimasys will introduce readers to knowledge about Mail merge – How to send personalized emails to multiple people
What is mail merge?
Mail merge is an extension for Google Sheets, used to merge mail. It allows you to create multiple copies of a message and send it to many people at once. You just need to have a template with fields of information to fill in (Name, gender, requirements, ...), then Mail merge will automatically combine information based on an existing list.
This utility will be very useful if you constantly have to send the same email to many people, only differing in certain fields of information (recipient information, time, location, ...). For example: Email marketing, Email inviting interview or Email sent to customers during events.
How to install and use Mail merge
Step 1: Install Mail Merge
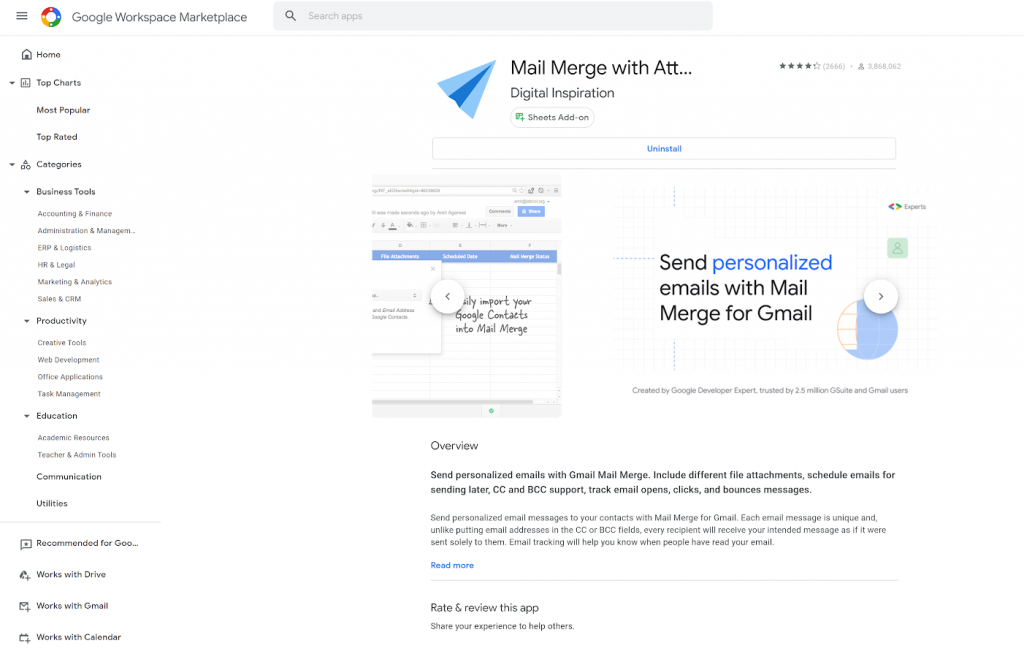
Before, using the Mail Merge utility, you need to integrate this utility with your Google account: here. Install the Mail Merge utility for Google Sheets.
Then select “tiếp tục”
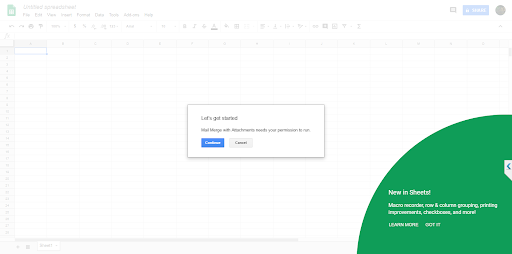
Next, you will have to allow Mail Merge access with your Google account, by selecting “Allow”

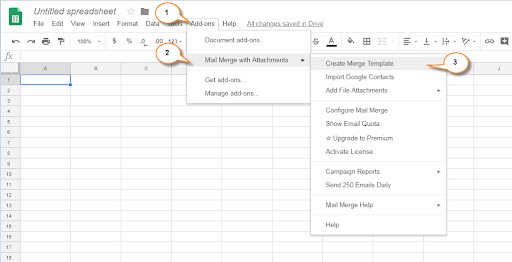
Step 2: Create a Mail Merge template
The Mail Merge utility opens a new unnamed sheet on Google Sheets. There, you enter Add-ons > Mail Merge with Attachments > Create Merge Template:
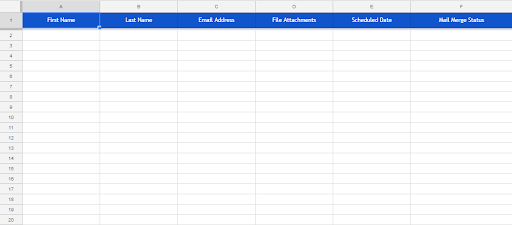
A blank mail merge template is created in the unnamed worksheet, containing required columns like First Name, Last Name and Email Address, File Attachments, etc….
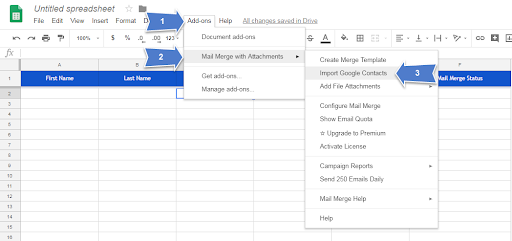
Step 3: Enter a list of contacts
To add a list of contacts available on Google Contact, you can follow these steps:
Add-ons -> Mail Merge with Attachments -> Import Google Contacts:
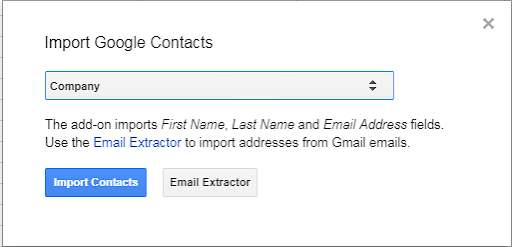
If you have a certain group of recipients to send bulk emails to, you might want to create a group in Google Contacts. Select the group containing the email addresses you want to use from the drop-down list and click Import ContactS. Then click the X in the upper right corner to close the dialog box.
Step 4: Add attachments.
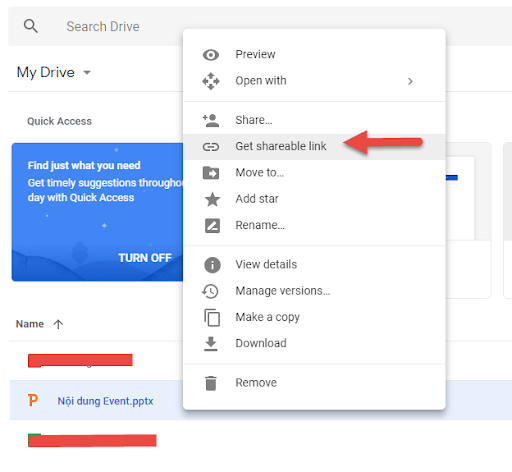
One of the items you want to customize in every email is attachments. You can attach a different file to each email using a link to the file in your account Google Drive mine. To do that, you open a new tab and log in Google Drive. Then, upload the file you want to attach to the email. You can drag files into the browser window to upload them. Next, right click on the uploaded file and click Get shareable links.
In the pop-up dialog, make sure that the slider Link sharing on turned on. If link sharing is already enabled, the URL is automatically copied when you select it Get shareable links. If you don't see a message that the link has been copied to the clipboard, select the URL in the dialog box and copy it.
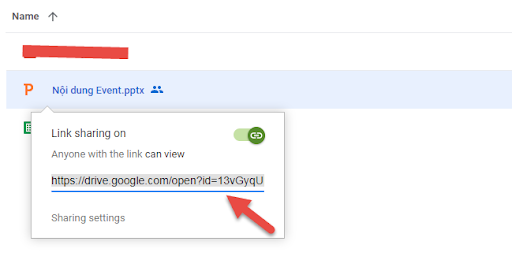
Go back to the Mail Merge sheet and paste the URL in the column File Attributes to the person you want to send this file to. You can send a different file to each contact in your list. You can also include multiple attached gile URLs, separated by commas “,".

Step 5: Plan to send emails
Pillar Scheduled Data allows you to specify a date and time to send the email, which can be different for each recipient. To schedule an email, you enter the desired date and time, using the format mm/dd/yyyy hh:mm (month/day/year hour:minute) in the column Scheduled Date for each address. To send multiple mails immediately after they are set up, leave that column blank.

Step 6: Add custom content
Besides the standard fields that are available in the Mail Merge template, you can add other custom fields. Perhaps you want to add information like the recipient's email address or member number. You can add multiple columns to the worksheet to store that information. The example below will add the column Title. To add a column to a Mail Merge worksheet, move your mouse over the column header of the most recently imported column. Click the down arrow button that appears and then click Insert 1 right.

Step 7: Create email in Gmail
Now it's time to create the email that you want to send to the contacts in the mail merge sheet and use the columns to customize each email. You open a new tab and sign in to the same Gmail account that you use for the mail merge sheet. Create a new email and enter the subject and body of the email. You can also add rich text formatting and inline images in your emails. To add fields to an email such as Title and Last Name , you insert field names using the notation {{…}} {{…}}.
For example, if you add {{Title}} {{Last Name}} to an email, you can also add other variation fields to the subject line. If you've already added the attachment URL to the mail merge worksheet, you don't need to add the variation fields to the email. They will be automatically added in the email.

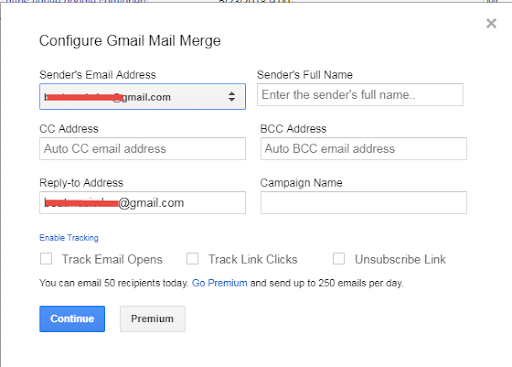
Step 8: Configure Mail Merge
Return to the Mail Merge sheet and Add-ons > Mail Merge with Attachments > Configure Mail Merge.

Enter information for the email such as sender's full name, CC, BCC. If the sender's email address is different from the Gmail address you're signed in with, select the email address from the drop-down list. The posted email address is also used as the Reply-to Address, but you can change that. Next, you click on tiếp tục.
Step 9: Send email.
You return to the sheet Mail Merge and click on Run Mail Merge to start sending emails. If you have added the date and time in the column Scheduled Date for any or all communications, emails will be sent from time to time. Emails for unscheduled contacts will be sent immediately. Alternatively, you can try sending an email to test it out first by clicking Send a Test Email.

Finally, you click on Done.
Hopefully, the information about "Mail merge – How to send personalized emails to multiple people” will help you in your work.
Contact:
- Email: gsuite@gimasys.com
- Phone number: Hanoi: 0987 682 505 Ho Chi Minh: 0974 417 099
- Sign up for a free trial: Here
Update: Gimasys
Related Posts