How to install Team Drive 2018
Google Team Drives is a common space so that Teams in your company can easily store, search, and access their document files from anywhere and on any device.
1. Overview of Google Team Drive
Unlike files in My Drive, documents in Team Drive Belonging to a Team instead of an individual. Therefore, even if Team members quit, these files remain intact, thereby helping your Team continue to access data, share information, and get work done.
Note: Team Drive only supported in versions G Suite Business, G Suite Enterprise or G Suite for Education. If you cannot enable Team Drive, contact the admin of the company where you work.
Users of G Suite Basic or without a G Suite account (a Gmail account under a business domain name) will not be able to use Team Drive.
2. How to install Team Drive
You can create many different Team Drive folders, so when you want to add users or download files, etc., you must first select a Team Drive folder that you want to change. |
Note: If you are unable to create a Team Drive, your Admin may have disabled this function. Contact your admin for assistance.
2.1. How to add members and assign access rights:
When you add a new member, they will be granted full rights to upload, edit, delete files or invite new members. However, you can change the permissions of these members.
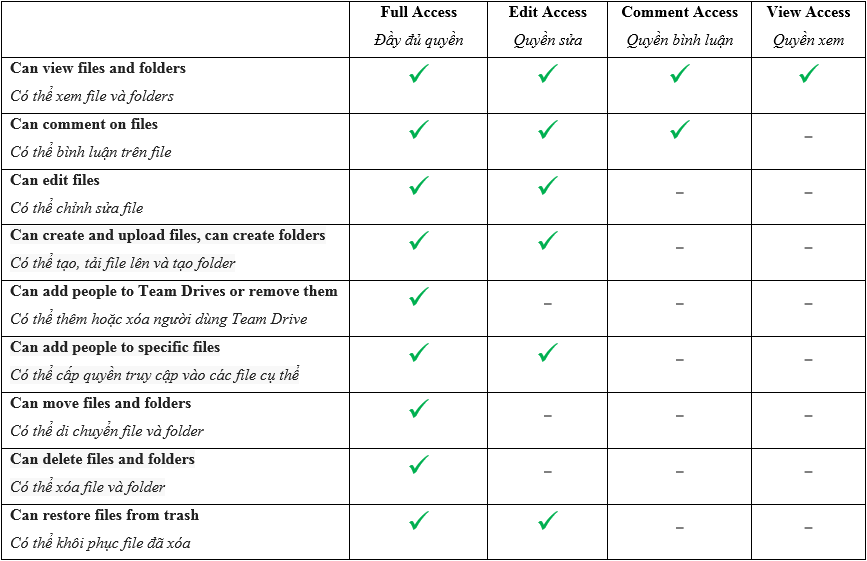
To add members and set permissions, you need Full Access prior to:
|
2.2. Change permissions of members in Team Drive
To assign permissions to each member, you need Full Access:
|
2.3. Remove member
To remove a member, you need Full Access:
|
Note: If you remove someone from Team Drive, they may still have access to some files that were shared in other ways. For example, files shared in "All company members can see" mode will still be accessible to them.
3. How to add files and folders in Team Drive
3.1. How to create a new folder
|
Note: To move a folder, contact your admin.
3.2. To upload an existing folder from your computer:
- In the left navigation bar, select a Team Drive.
- On your computer, drag the current folder and drop it into the Team Drive. Or, tap new > Folder Upload.
3.3. To add and open files:
To add files to a Team Drive, you need at least Edit Access. Any files you add are owned by the whole group. Even if you leave Team Drive, your files will still exist in Teams.
|
4. How to manage files
After you add files, you can star important files, move files, and delete files.
In this section, you will learn how to:
4.1. Star important files
| Mark important files so you can find them faster when you need them. Just right click on the file or folder and select Add star.
To see all your starred files and folders, look to the left navigation bar, tap Starred. |
|
4.2. Move files
| You can move any files you own to Team Drive, whether they're saved in a different Drive folder or from your computer or mobile device.
To move files between Team Drives or from My Drive to Team Drive, drag the file to the destination folder in Team Drive. |
Note:
- To move files between Team Drives, you must have Full Access to the root Team Drive folder and at least Edit Access of the destination Team Drive folder. For example, if you want to transfer the file “List of candidates” from folder Personnel to folder Administration, you must have Full access in the Human Resources folder, and at least Edit Access in the Administration folder.
- If someone else owns the file, you have to ask them to move it (you can't move a file you don't own).
- To move folders, contact your admin.
4.3. Delete or restore files:
|
- Restore a file:
- You must have Edit access or higher permissions to restore a certain file.
- In the left navigation bar, select a Team Drive.
- At the top, next to the Team Drive's name, tap the down arrow > View Trash.
- Select the file you want to restore and select Restore (clock icon).
4.4. Search for a file
|
- To search for a folder in Team Drives: You can only search folders in My Drive or in Team Drive.
- In the search bar, click the down arrow and you will see a window Advanced window appears, go to school Location.
- (Optional) To search for a specific word or phrase related to a file or folder, enter the word or phrase in the search box.
- Besides Location, click Anywhere and choose Team Drives.
- When you find the folder you want to search, tap Select
- Click Search to open the folder and search for your files.
5. Share and collaborate
Any files you put into Team Drives are automatically shared with Team Drive members. However, you can also share files stored in Team Drive with people in your business, even if they are not members of Team Drive.
In this section, you will learn how to:
5.1. Share files:
To share files, you need at least Edit access for that file
Note: Your business has the right to restrict file sharing outside of the company. Please contact admin for more information.
|
If you set the access permission to only View or Comment, you can stop other people's work download, print and copy shared files.
|
|
Note: You may not see certain optional functions if your admin has turned them off.
5.2. Unshare some files
|
|
Note: If you unshare a file but the file is still shared with the whole business or a group that includes the person whose access has just been revoked, they can still access the file.
Update: Gimasys
Related Posts